介绍 信号和槽机制用于对象之间的通信。信号和槽机制已经成为Qt的核心功能,许多核心的交互和信息的传递都是通过信号和槽机制来完成的。而connect函数就是链接信号和槽机制的交点。在认识connect函数之前我们先要对Qt的元对象系统有所了解。
元对象系统 Qt的元对象系统(Mate-Object System)是一套C++语言的扩展,它为Qt框架提供了一些关键的功能,其中最关键的是提供了信号和槽函数的连接。其的原理是QObject类可以为利用元对象系统的对象提供一个基类,并且当继承于QObject类定义中使用了Q_OBJECT宏,Qt的原编译器(moc)就会为其提供实现元对象功能所需的代码。因此使用信号与槽机制的前提是该类是继承于QObject类并且显示的定义Q_Object宏和在编译脚本当中开启moc。详细请查看:Qt元系统 、如何使用moc 。
信号与槽 信号(Signal) :在特定情况下被发射的事件,其是公共访问函数,可以从任何地方发出。并且信号和槽机制完全独立于任何图形用户界面事件循环。也就说图形界面只是用来处理用户的操作,而实际上的执行是通过信号与槽机制来进行完成。在类中一般使用signals来作为信号的声明,形式如下:
1 2 signals:const char * signal ()
槽(Slot) :对信号进行相应的函数。槽是普通的C++函数,可以被正常调用。也就说其可以被声明为public、protected、private其也可以拥有如何参数。但作为插槽,任何组件都可以通过信号-插槽连接调用它们,无论其访问级别如何。这就意味着,如何类的实例发出的信号都可以导致一个无关类的实例调用一个私有槽。例如有一个继承于QMainWindow的子类MainWindow里面通过ui设定了一个QPushButton的实例slot_button通过connect函数让slot_button的点击信号与MainWindow的公开函数PrintSlot进行绑定。
1 2 3 4 5 6 7 8 9 10 11 12 13 14 15 16 17 class MainWindow : public QMainWindowpublic :MainWindow (QWidget *parent = nullptr );MainWindow ();void PrintSlot () void signalsAdd (int i) private :
1 2 3 4 5 6 7 8 9 10 11 12 13 14 15 16 17 18 MainWindow (QWidget *parent)QMainWindow (parent)ui (new Ui::MainWindow)setupUi (this );connect (ui->slot_button,&QPushButton::clicked,this ,&MainWindow::PrintSlot);MainWindow ()delete ui;void MainWindow::PrintSlot () qDebug ()<<"print no slot \n" ;
当点击slot_button时就会显示print no slot
1
2
public slots:int TextSlots ()
Connect 函数原型 那么就到关联信号与槽的函数Connect了,其的函数原型有以下几种:
1
2
3
4
5
6
7
8
9
10
11
12
static QMetaObject::Connection connect (const QObject *sender, const char *signal, const QObject *receiver, const char *member, Qt::ConnectionType = Qt::AutoConnection) static QMetaObject::Connection connect (const QObject *sender, const QMetaMethod &signal, const QObject *receiver, const QMetaMethod &method, Qt::ConnectionType type = Qt::AutoConnection) inline QMetaObject::Connection connect (const QObject *sender, const char *signal, const char *member, Qt::ConnectionType type = Qt::AutoConnection) const
以第一个函数为例子:第1个参数为信号发射源对象,也就是发出信号对象的实例;第2个参数为所发射的信号,分为多种方式我们后面讨论;第3个参数是接受信号的对象,表示本部件,可以被省略,因为在第3个函数中,该参数默认为this。第4个参数是要执行的槽,这个也是要分为多种方式讨论;第5个参数的作用是指定信号和槽之间的连接类型,也就是决定了信号如何触发槽函数的调用。其的值有:Qt::AutoConnection :默认值,使用这个值则连接类型会在信号发送时决定。如果接收者和发送者在同一个线程 ,则自动使用Qt::DirectConnection类型。如果接收者和发送者不在同一个线程 ,则自动使用Qt::QueuedConnection类型。Qt::DirectConnection :槽函数会在信号发送的时候直接被调用 ,槽函数运行于信号发送者所在线程。效果看上去就像是直接在信号发送位置调用了槽函数。这个在多线程环境下比较危险,可能会造成奔溃。当不在同一个线程使用其,但也可能导致另一个线程槽函数始终不响应。Qt::QueuedConnection :槽函数在控制回到接收者所在线程的事件循环时被调用,槽函数运行于信号接收者所在线程。发送信号之后,槽函数不会立刻被调用,等到接收者的当前函数执行完,进入事件循环之后,槽函数才会被调用。多线程环境下一般用这个 。Qt::BlockingQueuedConnection :槽函数的调用时机与Qt::QueuedConnection一致,不过发送完信号后发送者所在线程会阻塞,直到槽函数运行完。接收者和发送者绝对不能在一个线程,否则程序会死锁 。在多线程间需要同步的场合可能需要这个Qt::UniqueConnection :这个flag可以通过按位或(|)与以上四个结合在一起使用。当这个flag设置时,当某个信号和槽已经连接时,再进行重复的连接就会失败。也就是避免重复连接 。Qt::SingleShotConnection :Qt6.0当中新引入的链接类型,其是一个标志,可以与上述如何一种连接类型结合使用。它指示信号与槽的连接将在信号发出后立即执行一次,然后连接会被自动断开。这意味着一旦槽函数执行完毕,信号就不会再次连接到这个槽 。
1 2 3 4 5 6 7 8 9 10 11 12 13 14 15 16 17 18 #include <QObject> #include <QDebug> #include <QTimer> #include <QThread> #include <QApplication> class WorkerThread : public QThreadpublic :void run () override void WorkStarted () void WorkUniqueConnection ()
定义如下:
1 2 3 4 5 6 7 8 9 10 11 12 #include "workerthread.h" void WorkerThread::run () qDebug () << "Worker thread started" ;emit WorkStarted () ;qDebug () << "Worker thread emitting signal" ;sleep (2 ); qDebug () << "Worker thread finished" ;
其次引入槽类MyApplication模拟接收到信号执行操作的类。其继承于QObject类,每个函数的名字都对应各个值的情况,声明如下:
1 2 3 4 5 6 7 8 9 10 11 12 13 14 15 16 17 18 19 20 21 22 23 #include <QObject> #include <QDebug> class MyApplication : public QObjectpublic :explicit MyApplication (QObject *parent = nullptr ) void AutoConnectionSlot () void DirectConnectionSlot () void QueuedConnectionSlot () void BlockingConnectionSlot () void UniqueConnectionSlot () void SingleShotConnectionSlot ()
定义如下:
1 2 3 4 5 6 7 8 9 10 11 12 13 14 15 16 17 18 19 20 21 22 23 24 25 26 27 28 29 30 31 32 33 34 35 36 #include "myapplication.h" MyApplication (QObject *parent)void MyApplication::AutoConnectionSlot () qDebug () << "AutoConnection slot called" ;void MyApplication::DirectConnectionSlot () qDebug () << "DirectConnection slot called" ;void MyApplication::QueuedConnectionSlot () qDebug () << "QueuedConnection slot called" ;void MyApplication::BlockingConnectionSlot () qDebug () << "BlockingConnection slot called" ;void MyApplication::UniqueConnectionSlot () qDebug () << "UniqueConnection slot called" ;void MyApplication::SingleShotConnectionSlot () qDebug () << "SingleShotConnection slot called" ;
最后在主函数当中为了直观的演示其的作用,我们创建一个QPushButton的实例button,并将部分的槽函数绑定QPushButton的点击信号代码如下:
1 2 3 4 5 6 7 8 9 10 11 12 13 14 15 16 17 18 19 20 21 22 23 24 25 26 27 28 29 30 31 32 33 34 35 36 37 38 39 40 41 42 43 44 45 46 47 48 49 50 51 52 53 54 55 56 57 58 59 60 61 62 63 64 65 66 67 68 69 70 71 72 73 74 75 76 77 78 79 80 81 82 83 84 85 86 87 88 89 90 #include "mainwindow.h" #include "myapplication.h" #include "workerthread.h" #include <QSignalSpy> #include <QTest> #include <QApplication> #include <QLocale> #include <QTranslator> #include <QPushButton> void TestUniqueConnection (WorkerThread& worker_thread,MyApplication& my_application) QSignalSpy spy (&worker_thread,&WorkerThread::WorkUniqueConnection) ;connect (&worker_thread,&WorkerThread::WorkUniqueConnection,connect (&worker_thread, &WorkerThread::WorkUniqueConnection,WorkUniqueConnection ();if (spy.count () == 1 )qDebug () << "Test passed: Signal emitted once." ;else qDebug () << "Test failed: Expected signal to be emitted once, " "but it was emitted" << spy.count () << "times." ;int main (int argc, char *argv[]) QApplication a (argc, argv) ;const QStringList uiLanguages = QLocale::system ().uiLanguages ();for (const QString &locale : uiLanguages) {const QString baseName = "Qt_blog_" + QLocale (locale).name ();if (translator.load (":/i18n/" + baseName)) {installTranslator (&translator);break ;QPushButton button ("click me" ) ;show ();TestUniqueConnection (worker_thread,my_application);connect (&worker_thread, &WorkerThread::WorkStarted, &my_application,connect (&worker_thread, &WorkerThread::WorkStarted, &my_application,connect (&worker_thread, &WorkerThread::WorkStarted, &my_application,connect (&button, &QPushButton::clicked, &worker_thread,start ();});return a.exec ();
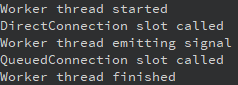
解释:TestUniqueConnection用来测试Qt::TestUniqueConnection的统一性,这里借助了QSignalSpy类来辅助检查是否只发送了一次信号,具体的功能请查看QSignalSpy Class 这里只使用了其的统计WorkerThread::WorkUniqueConnection发送信号的个数,如果发送信号只有一个说明Qt::TestUniqueConnection具有统一性,不会重复链接。而在主函数当中则是测试Qt::QueuedConnection、Qt::DirectConnection、Qt::SingleShotConnection。当点击按钮的时候就会调用worker_thread的run函数,而run函数当中会释放一次WorkStarted的信号。结果如下:
而在第二次点击的时候可以看见已经没有"SingleShotConnection slot called"了说明Qt::SingleShotConnection是一个一次性的信号,使用完之后立即被释放。
而Qt::DirectConnection在点击的时候就会被立即启动,Qt::QueuedConnection会在函数结束之后显示出来这里是因为使用了QThread::sleep函数才会让Qt::QueuedConnection显示在之前,当注释之后更加明显,这里就不再多做演示了。至于Qt::BlockingQueuedConnection这里因为会导致程序堵塞,就不做演示如果有能力的可以参考以下代码在程序当中进行测试:
1 2 3 QObject::connect (&worker_thread, &WorkerThread::WorkStarted, &my_application,
到这里就已经介绍完函数的原型,接下来就介绍该函数应该怎么使用了。
函数的使用 Qt4及其之前 Qt4及以前当中使用宏的模式,主要通过connect+宏的方式。即:Connect(发送对象,信号,接收对象,槽函数),其中发送信号和槽函数需要使用SIGNAL()和SLOT()来进行明确的声明。这里定义一个QPushButton的子类MyButton作为测试类,这里定义一个无参的信号myClicked()和有参信号MyClicked(const QString &text)将MyButton放置在QMainWIndow的子类MainWindow当中进行测试。MyButton的声明如下:
1 2 3 4 5 6 7 8 9 10 11 12 13 14 15 16 17 18 19 20 21 22 #ifndef MYBUTTON_H #define MYBUTTON_H #include <QPushButton> class MyButton : public QPushButtonpublic :explicit MyButton (QWidget *parent = 0 ) void myClicked () void myClicked (const QString &text) private slots:void emitMyClicked () #endif
MyButton的定义如下:
1 2 3 4 5 6 7 8 9 10 11 12 13 14 15 #include "mybutton.h" MyButton (QWidget *parent) : QPushButton (parent)connect (this , SIGNAL (clicked ()), this , SLOT (emitMyClicked ()));void MyButton::emitMyClicked () emit myClicked () ;emit myClicked (text()) ;
在连接自己的时候就必须使用SIGNAL和SLOT的宏进行连接了,而在MainWIndow更是如此:
1 2 3 4 5 6 7 8 9 10 11 12 13 14 15 16 17 18 19 20 21 22 23 24 25 26 27 28 29 30 31 32 33 34 35 36 37 38 39 40 41 42 43 44 45 46 47 48 49 50 51 52 53 54 55 #ifndef MAINWINDOW_H #define MAINWINDOW_H #include <QMainWindow> #include "mybutton.h" class MainWindow : public QMainWindowpublic :explicit MainWindow (QWidget *parent = 0 ) private slots:void onMyButtonClicked () void onMyButtonClicked (const QString &text) private :#endif #include "mainwindow.h" #include <QVBoxLayout> #include <QDebug> MainWindow (QWidget *parent) : QMainWindow (parent)new MyButton (this );new QVBoxLayout;addWidget (myButton);new QWidget (this );setLayout (layout);setCentralWidget (centralWidget);connect (myButton, SIGNAL (myClicked ()), this , SLOT (onMyButtonClicked ()));connect (myButton, SIGNAL (myClicked (const QString&)), this , SLOT (onMyButtonClicked (const QString&)));void MainWindow::onMyButtonClicked () qDebug () << "MyButton was clicked!" ;void MainWindow::onMyButtonClicked (const QString &text) qDebug () << "MyButton was clicked with text:" << text;
这种写法相对于新版来说比较麻烦,但是可以比较简便的看出到底使用了那个信号和槽函数,有利有弊吧。在Qt5.13当中使用宏已经不再受
Qt5.0-Qt5.6 Qt5相对于之前推出了新的connect重载模式,不需要特地使用SIGNAL()和SLOT()宏,可以编译时做类型检查。connect函数原型如下:
1 2 3 4 5 [static ] QMetaObject::Connection QObject::connect (const QObject *sender, PointerToMemberFunction signal, const QObject *context, Functor functor, Qt::ConnectionType type = Qt::AutoConnection)
该重载方式的使用十分简便,以上面的测试Qt::QueuedConnection只需要改为:
1 2 QObject::connect (&worker_thread,&WorkerThread::WorkStarted,
即可以使用,但对重载来说比较麻烦因为在使用的时候Qt会尝试根据上下文自动选择正确的重载。然而,这可能导致不明确的链接,因为Qt无法总是确定应该选择那个重载。那么如果想指定重载的信号或者槽就只能使用C++提供的强制转换运算符 或者上文提到的SIGNAL()和SLOT()宏。这里演示C++提供的强制转换运算符static_cast<>();以上文的MyButton为例子,connect改为:
1
2
connect (myButton, static_cast <void (MyButton::*)(const QString&)>(&MyButton::myClicked), this , static_cast <void (MainWindow::*)(const QString&)>(&MainWindow::onMyButtonClicked));
这样才可以运行,但在代码上感觉还是不如使用宏,所以如果是使用的发送信号方和接受信号方有多种重载的信号和槽函数在Qt5.0-Qt5.7当中还是推荐使用宏吧。
Qt5.7 在Qt5.7版本当中引入一个模板工具QOverload,其主要用于解决在使用QObject::connect时处理重载信号和槽问题。原理是通过明确指定哪一个重载信号或槽应该被连接,避免了歧义和潜在的错误。引入之后connect的函数原型变为:
1
2
3
4
5
6
7
8
template <typename Func1, typename Func2>static QMetaObject::Connection connect ( const typename QtPrivate::FunctionPointer<Func1>::Object *sender, Func1 signal, const typename QtPrivate::FunctionPointer<Func2>::Object *receiver, Func2 slot, Qt::ConnectionType type = Qt::AutoConnection)
而在使用的时候相对于之前使用强制转换更加简单。还是以前面的为例子,使用时将connect改为:
1
2
connect (myButton, QOverload<const QString&>::of (&MyButton::myClicked), this , QOverload<(const QString&)>::of (&MainWindow::onMyButtonClicked));
这种方法相对于之前更加简单,在制定重载的信号和槽时候推荐使用该方法。
lambda lambda 于Qt5.0当中被引入到connect函数当中,该方法可以极大的简便槽函数,不需要单独再写一个槽函数用于信号的处理。connect函数的原型为:
1 2 3 QObject::connect (const QObject *sender, const char *signal, const QObject *receiver, const char *method,
使用起来也非常简单,和正常的lambda表达并无二致。还是以上面的MyButton为例子,其可以简化为:
1
2
3
connect (myButton, static_cast <void (MyButton::*)(const QString&)>(&MyButton::myClicked), this , [this , text = QString ()](const QString &t) qDebug () << "MyButton was clicked with text:" << text;});
这样也可以做到上述的效果。所有的代码都可以在仓库:Qt博客 当中找到。